Scraps

Jan. 28th, 2018 07:42 pm
roadrunnertwice: Silhouette of a person carrying a bike up a hill (Bike - Carrying)

I started writing a post about that final push installing the stair treads, and I couldn't finish it, it was just too exhausting and boring! So instead here's a bunch of micro-posts.


I bruised my head on the mailbox while I was vacuuming under the sawhorses on the front porch. I feel like that is a very distinct flavor of chaos.


There's theoretically two orders you could install a stair tread and a riser (riser behind, or riser sitting-on), and I'd decided to do it one way and then it turned out the size of pieces would only support doing it the other way. So I threw a minor tizzy fit.

Anyway, it turned out for the best, because the slight bendiness of the risers would have made the first way look like complete garbage.


All our research said that with stair treads you use nails and glue (well, "construction adhesive") together. I hate glue (on account of it being the worst), but using nails alone is apparently not the move so I sucked it up.

Sam and several other people told us the glue to use was this substance called "Bostik's Best." Here's my review of it: I don't wish any particular misfortune on the families of the people who developed Bostik's Best. It is not complete bullshit.


Once everything was all cut and 100% ready to go, installing a riser and the stair tread above it involved seven cycles of handing different tools back and forth. It went like caulk gun -> brad nailer -> drill -> shopvac -> caulk gun -> nails and hammer -> nailpunch. And somewhere in there Ruth had to squeeze past me to go stand on the work-in-progress stair tread.


Putting a tiny invisible bevel on one side of a stair tread makes it easier to drop into place.


AS EVER with this sort of thing, the first stair we did had a bunch of bullshit extra complexities that weren't repeated anywhere else.

The only other bad one was the sixth step, because the left side was unsquare in a unique and unexpected way that almost made it come out visibly crooked. I had to cut a replacement sixth tread, then find a narrower stair above where I could re-use the cattywompus one.

roadrunnertwice: Silhouette of a person carrying a bike up a hill (Bike - Carrying)

Other random baseboard bits:

  • Your old baseboards had a bead of caulk up top, and you'll need to scrape the remnants off the wall. It's basically a rubbery plastic, and a small wood chisel works great for this. That set of chisels has been kind of an all-star in general, tbh. I got them to deal with replacing the deadbolt, and they've come in handy on every project since.
    • The deal with replacing the deadbolt was, the old deadbolt was Too Secure. As in, it was getting so janky that one of our keys could open it but not close it, and the other could close it but not open it. We're not trying to initiate a nuclear launch, we're just trying to get in the front goddamn door, jesus.
  • So, why do wood floors need quarter-round shoe molding? For this, basically.
  • Quarter-round sticks out further than the baseboard, so wherever it's going to dead-end (like at a doorjamb) you should do something called a "return," which is basically just doing a negative-length outside corner. It looks like this. Just knowing the name should put you ahead of me; I had the vague sense something didn't add up and had to Google image search until I saw something that looked better. (Then later Ruth told me she'd already known about them but hadn't mentioned it because she assumed I'd learnt all the stuff.)
  • We used an 18ga (aka "brad") nailgun on both the baseboards and the shoe. I think the "pro" thing is to use 16ga (bigger) on the boards and 23ga (smaller, aka "pin") on the shoe, but this seems to be working fine. You want to nail the boards into studs, but the shoe just nails into the board so whatever. Find the studs ahead of time and put some blue tape on the floor or above the top of the baseboards.
  • Gotta fill in the nail holes. For natural wood you'd probably use wood filler putty, but ours are white so caulk is the move. It turns out a disposable foam earplug makes a good tool for caulking nail holes. A firm makeup sponge would probably also work, but we didn't have those handy because we're bad femmes. The hardware store dude said to use your finger, but that shit has solvents or petroleum distillates or whatever and I'm a big ol wuss about toxics. (Not that you'd fucking know it, for how often I manage to poison myself anyway.)
  • More relevant instagrams: pre-caulk, post-caulk, landing, jank from before we got here, the whole fukken journey.
  • I could probably do a whole post on caulk alone, but tbh I'm still not convinced I know the best way to do it. Ask someone else about caulk.
  • You'll notice The Fucking Triangle looks mostly OK, and I am not even going to talk about what that took because I feel like there's a good chance of hurting yourself if you try it and I don't want to be involved.

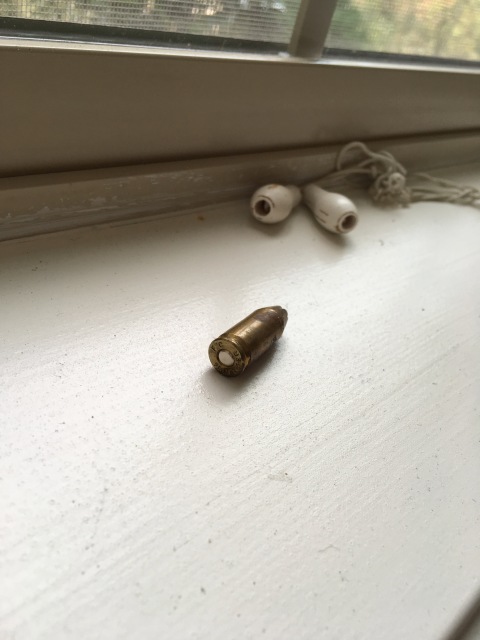
Finally: When I took the old baseboards off in our bedroom, I found a,

A Luger 9mm hollow-point, apparently

uhhhhhh,

A Luger 9mm hollow-point, apparently

...a live 9mm hollow-point bullet. There's treasure everywhere, my dudes.

roadrunnertwice: DTWOF's Lois in drag. Dialogue: "Dude, just rub a little Castrol 30 weight into it. Works for me." (Castrol (Lois))

OK, where did I leave off, here?

  • The upstairs floors are fucking done, holy shit!!!
  • The stairs are cooling their heels for a bit.
  • We've installed baseboards in the office and the landing!
  • Then we had to basically move out of the house again, because we hired some guys to re-do the downstairs floors. Ruth and I are crashing with her parents, and our housemate is at his gf's place.

Fucking... remember how I was talking about order-of-operations problems? To get ready for the floor bros, we had to get all of the furniture out of the downstairs. The only place to put it was the garage, but the garage was filled with boxes of stuff that belongs in the bedrooms and office. So we had to get that out and into the upstairs, but if we did that before finishing the floors and baseboards in the office, we'd be creating another whole move-around problem for ourselves later. So we were sort of on a time limit to finish the office, basically; if we failed, oh well, but we'd reduce the total work if we could manage it.

And we did it! But, baseboards, tho. A whole nother set of finicky skills to learn on a time limit. IDK if I have the patience to retread all the stuff I hinted at on Instagram over the past few, but basically baseboards are way more important than I ever thought in terms of making a room look normal. If you're installing wood floors to replace carpet, you have to take off the existing baseboards with a wonder-bar (pro-tip 1: if you're also painting, do this before LITERALLY ANYTHING ELSE. pro-tip 2: use a stud-finder to decide where to start malleting the crowbar in, and pull forward instead of levering back), and then if they turn out to be MDF garbage instead of wood, you'll probably have damaged them too much to re-use and will have to get new ones. Plus, if you're doing wood floors you definitely want quarter-round "shoe molding," which you probably didn't have if you're coming from carpet.

VIDEO BREAK: Here's some stuff I found really helpful.

  • Leah explains how to cope, which is kind of a mind-blowing trick. Watch this even if you're not gonna go deep on this, it's neat.
  • Leah does a scarf joint.
  • A guy who might be Ned Flanders IRL goes fucking DEEP. Check out the insanity of the Collins coping foot at 12:00. Hell no, buddy.
  • This one is actually a bummer because Leah mislead me about how to do an acute angled outside corner! Dividing the angle by 2 to get the miter is wrong, because the miter is the difference from 90°. In other words, if you measure an 88° corner, you need to set a 46° miter for each piece, which will result in 44° angles (half of 88°) on the wood. So basically, the thing she says to do to get the miter for obtuse angles is what you should always do. Still, the tip about needing a locking protractor is 👌🏼.

Anyway, in case it wasn't clear, you have some wacky-pants math ahead of you if you're doing anything but nailing up the previous boards.

HERE IS A FUN WORD PROBLEM.

Trig ahoy, fuckheads )

I had to figure out how to calculate that on the big obtuse angle leading into The Fucking Triangle, and it was something of an adventure.

roadrunnertwice: Wrecked bicyclist. Dialogue: "I am fucking broken." (Bike - Fucking broken (Never as Bad))
AS THE PROPHETS FORETOLD, flooring the final 1/3 of the office is some fucking bullshit. There's nowhere to put the boards, there's nowhere to stand, there's nowhere to swing the hammer, carrying the boards downstairs to saw them in the bathroom is (sing it again:) some fucking bullshit, AND ALSO the room itself has a bunch of fiddly annoying bits including a Fucking Triangle.


w h y

*pop*

Nov. 9th, 2017 10:37 am
roadrunnertwice: Kim Pine wearing headphones, as someone hammers on her ceiling. (Music / racket (Scott Pilgrim))
As promised, here's some video of Ruth nailing down a floorboard:

Instagram embeds don't seem to work on DW, so you gotta click through.

The piece of wood she's using to knock it into place first is Whack Friend, who is a staunch ally in these trying times. Basically, it takes some percussion to get a board into place but you can't hit the board itself with a mallet because you might damage the tongue. So you put the groove of a sacrificial piece of wood on there to distribute force past the tongue to the thicker part of the board, and then hit THAT piece. The tongue of the sacrificial piece will get in the way, so you should saw it off, and you should also decorate the piece somehow because otherwise you'll constantly lose track of it in your enormous piles of wood. Then you'll end up emotionally bonding with it, because after about two hours of this it feels like Whack Friend is the only one who understands you.

Standing on the board as you try to move it might seem counterproductive, but it's not. Keeps it from bouncing right back out again.

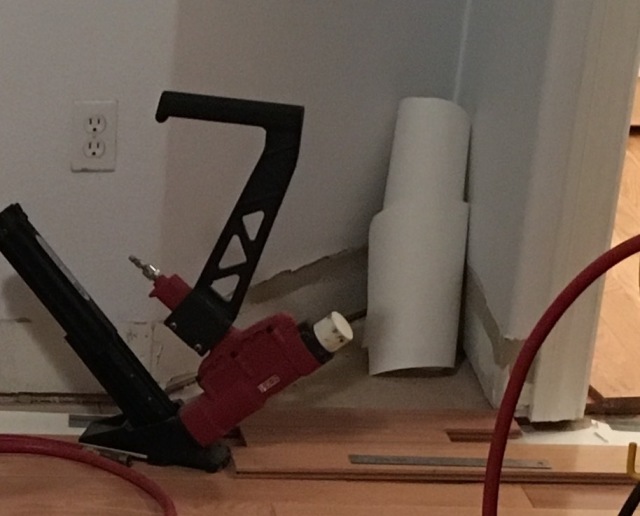
The big angled popgun thing is a pneumatic floor nailer. Her hammer blows aren't actually driving the nails in; that's done by about 80psi from an air compressor (borrowed from our hardcore handyman neighbors), and the white knob she's whacking is actually a valve. The reason the valve works by violence instead of pulling a trigger is because you're also trying to push the board up REAL SNUG against the last row as the nail goes in, to eliminate gaps. So it's dual-duty! Since the whack also activates the valve, the timing works out perfectly. It's a cleverly designed tool, IMO.

There's an art to judging how much gap you can close with brute nailing force; some boards are too warped, so you gotta call in help from the other person to bend it. (Or write it off as waste if it can't bend enough.)
roadrunnertwice: DTWOF's Lois in drag. Dialogue: "Dude, just rub a little Castrol 30 weight into it. Works for me." (Castrol (Lois))

OK, so we've been installing prefinished hardwood floors in the upstairs of our house (which we've been tentatively calling the Corner House to distinguish it from our former place). We managed to get our bedroom and our housemate's room finished before moving in, but missed the stairs, the landing, and the office. The stairs can wait indefinitely (and require a new skill set), and I just finished the landing this weekend, so that leaves the office.

Here's how you lay floor. First, you figure out what direction everything's going and how many different "zones" there are, which I don't even want to get into right now, and then you can tackle each zone (room, basically) separately. For each zone, you measure the length of the room (the width doesn't matter) at every point where the length might be different, and do some nail-biting arithmetic to make sure you won't use any illegal (sub 1") board widths at either end of the room, WHICH I DON'T EVEN WANT TO GET INTO RIGHT NOW. Then you use a frikken laser to draw your start line and nail down the first row by hand, then you nail down all the other rows, making sure you lay out five or so rows ahead so you don't paint yourself into a corner and use an illegal series of board transitions. (Which is yet another thing I'm not getting into today.)

The problem is, to do the main part of the floor you need a lot of boards plus a way to cut them for the ends of rows. What we've been doing is laying out a shitload of wood in the far half of the room, and then running the chop saw in an adjacent unfinished room because it makes a ton of sawdust that we don't want in our work area or living space. But now we're out of adjacent unfinished rooms! 😩

This is sort of the penultimate stage of the sliding-blocks puzzle we've been living in. What we think we're going to do is just run the chop saw in the far half of the room for as long as we can, trying to keep the sawdust mostly in the closet, and then we're going to have to move it somewhere else. But the garage is full! And it's rainy outside! So Ruth had the brilliant idea to run it in the downstairs bathroom, because it's a perfectly square space with almost no squirrelly little fixtures, and the only furniture is a bookshelf or two. We'll still have to carry a bunch of boards up and down the stairs, but at least this looks feasible. So, I guess we'll let you know how that goes.

We haven't been taking as many pictures of the actual flooring process as I'd like, because there's just not a lot of room in the flow of work for that shit. Oh well! I'll try and at least get a short video of Ruth running the pneumatic nailer or deploying Whack Friend.

Twinge

Oct. 23rd, 2017 10:23 am
roadrunnertwice: Wrecked bicyclist. Dialogue: "I am fucking broken." (Bike - Fucking broken (Never as Bad))
All this flooring work is starting to strain the terms of the peace agreement with my right wrist. 😬